I have been knitting and crocheting up a storm.
I finally finished a scarf I started, it was really simple but I ran out and had to go buy a new skein to finish it.
The felted bag I am in the middle of making is knitted and just needs to be felted, so next time I am at Dad's I should be able to finish it!
I just started a Grannie Square afghan for myself in really pretty purples, green and taupe.
When I finally get my camera fixed I can start posting photos of things I am making.
Sunday, December 14, 2008
Friday, November 07, 2008
Apples and Pork
For dinner the other night I made a really simple, comforting meal.
I started out by carmelizing some onions, mixing in some sliced apples, a bit of chopped garlic and salt and pepper. I then pushed it all to the side, added a bit more oil and browned up some pork steaks that I sprinkled with salt and pepper.
I also boiled up some diced potatoes that I mixed with butter and salt and pepper after they were drained. Some peas on the side, and it was so simple and so tasty!
Saturday, September 27, 2008
Apple Sauce and Pie Filling
Today was supposed to be a rainy nasty day and it turned out to be beautiful, so I went apple picking with Bethany. Adams Apple Orchard in Williston was doing pick your own apples for a decent price. I got a whole bushel for $26 (a bushel is 40lbs) and spent the rest of the day making apple sauce and apple pie filling. It was great, my mom came up to help and brought some stuff that I didn't have to make it easier.
At the end of the day, I came away with 11 quarts of homemade apple sauce, and 7 quarts of pie filling. I can't wait to do it next year, and to make some fruit jams and perhaps some pickles and relish!
At the end of the day, I came away with 11 quarts of homemade apple sauce, and 7 quarts of pie filling. I can't wait to do it next year, and to make some fruit jams and perhaps some pickles and relish!
Monday, September 15, 2008
Felted Bag - Finally Finished

Ok, so the bag I started back in March for a birthday present for Katy, whose birthday is in April, is finally finished! It has taken me a long time from start to finish, although there was a lot of time in there that I wasn't actually working on it.
I was originally going to add a liner to the bag, but after three attempts at making the liner, each time making some sort of large error, I gave up and decided to finish the bag!
Happy Birthday Katy! :-)
Tuesday, July 22, 2008
Turkish Beef Stew
Ok, so I forgot to take a picture of what I made yet again! I really need to remember that part.
For dinner last night I made a version of Rachael Ray's Turkish Beef Stew.
This is the recipe as it reads on her site.
3 1/3 TBS butter
1.5 lbs stew beef
1 cup canned chopped tomatoes with juice
1 cup beef broth
1 TBS white wine vinegar
1/8 tsp ground cinnamon
1/8 tsp ground cloves
salt
pepper
1/2 lb wide egg noodles
1/4 cup chopped parsley
1. In a large saucepan, melt 1 tablespoon butter over medium heat, add half of the beef and cook, stirring occasionally, until browned, about 5 minutes. Transfer with a slotted spoon to a plate. Repeat with another tablespoon butter and the remaining beef. Set aside.
2. Stir the tomatoes and beef broth into the saucepan, reduce the heat to low and stir, scraping up any browned bits. Add the reserved beef, the vinegar, cinnamon, cloves and 1/8 teaspoon pepper; bring to a simmer over low heat. Cover and cook until the meat is fork-tender, about 1 hour.
3. About 10 minutes before the stew is ready, cook the egg noodles according to the package directions. Toss with the remaining 1 1/2 tablespoons butter and season to taste with salt and pepper. Stir the parsley into the stew and serve with the noodles.
The changes I made were substituting a can of crushed tomatoes for the diced, and completely taking out the beef broth, instead using a bouillon cube. It made for a thicker, heartier sauce.
All in all, with having the spices at home already, it only cost me a whopping $3.87 to buy the stew beef, the noodles, and the crushed tomatoes. I took advantage of beef that was going out of date the next day so it had a discounted coupon on it! Great way to save a bit of money if you know you will be using the meat that night or freezing immediately.
Wednesday, June 04, 2008
Womens Beginner Mountain Bike Clinic
When I started biking last summer, I spent a lot of time riding on roads with my friend Bethany. Towards the end of summer, we decided to take a shot at mountain biking. The weather was perfect! Rainy drizzle, wet and muddy trails, it couldn't have been a better way to get introduced to mountain biking. After breezing up the 90 degree hill, the roots and rocks were a snap, the turns a bit curvy. You sensed my sarcasm right? I had to walk up the hill, had to stop and climb off the bike to get over some of the rocks, and on one sensational curve, went ass over tea kettle. In the process of falling, my calf took my saddle and turned it sideways. I had to hobble out of the woods, had trouble walking for a few days, and a contusion that lasted the rest of summer into the fall.
Last week, a week ago today actually, I participated in a womens specific mountain bike clinic with the Bellaship at Catamount Family Center. It was the hardest two hours of my life! Ok, so that is an exaggeration, but my muscles got quite the workout. This getting back on the horse experience was the best one yet. I rode in the woods, I rode over rocks and roots, I learned how to approach and lift over a larger rock or a small log in the way. Speed became my friend, brakes my enemy, and that looking where I wanted to go applies to everything I seem to enjoy doing.
I cannot wait for another clinic, and another mountain ride!

Friday, May 16, 2008
Sausage Biscuits and Gravy
I am still on the Cape and made sausage grave and biscuits for breakfast. This is a meal that is so satisfying, so warming, so UNHEALTHY, and should only truly be indulged once or twice a year. Of course, Jeremy loved it and wants me to make it again sooner rather than later.
Sausage Gravy and Biscuits
Jiffy Mix
Milk
Follow recipe on box :-)
1lb bulk breakfast sausage (I used McKenzie)
4-6 TBS flour
1 quart half and half
salt
pepper
Brown and crumble sausage in skillet, when cooked scoop with slotted spoon and set sausage aside. Add flour to the pan and whisk to form a loose paste or roux. When a nice light brown color is achieved whisk in the half and half and cook for a few minutes till it thickens. Season with salt and pepper to taste, I do recommend a fair amount of each though. Mix in the reserved sausage and spoon over biscuits and enjoy!
Thursday, May 15, 2008
Deuces Wild Chili
I am at the cottage on the Cape, enjoying some rest and relaxation. With the cool weather, its the perfect time to make chili. It is one of Jeremy's favorite meals.
I was originally planning on making a small batch of chili, just enough for one meal and a serving or two of leftovers. That plan went right out the window when I started shopping! I made enough to serve a small army, or a large family.
Deuces Wild Chili
2 lbs ground beef
2 onions - minced
2 red peppers (or color of choice) - minced
2 cloves of garlic - minced
2 6oz cans of tomato paste
2 23oz cans of crushed tomatoes
2 14.5oz cans of diced tomatoes
2 14.5oz cans of whole tomatoes
2 14.5oz cans of kidney beans
2 14.5oz cans of black beans
2-Alarm Chili Kit
1-2 tsp black pepper (to taste)
1-2 tsp salt (to taste)
2 tsp garlic powder
olive oil
Sweat onions, peppers, and garlic in olive oil till soft. Add ground beef and brown. Mix in tomato paste, 2 alarm chili kit, garlic powder. Stir in crushed, diced, and whole tomatoes, and beans. Bring up to a simmer, lower the heat and simmer at least 3 hours, stirring occasionally.
*** Sometimes I like to add 2 diced carrots as well!!!
Friday, May 09, 2008
Final Project
Graveyards have always drawn me in. I can spend hours wandering through them exploring. For this final project, I decided I wanted to show them for what the stones can be: art. I chose a day with blue sky, but some overcast shadows so there wasn’t a lot of glare. My favorite technique for this shoot was from the hip, and while that meant using automatic features, I was able to get some angles and points of view that I might not have gotten otherwise as I tend to over think my shots.
I wanted to keep the lighting as natural as possible, but used the shutter speed to help blur the background a bit. Editing was simple, I used curves to help balance out the light and dark, and saturation when I wanted the image in black and white.


Saturday, April 19, 2008
Barbara Kruger - Homage
Born in Newark, New Jersey, in 1945, Barbara Kruger is considered a conceptual artist. Her use of photographs and existing images with bold aggressive statements is the trademark of her work. This is seen with black and white images with the statements written in red, or white on red bases. Working as a graphic designer, art director, and picture editor rounded out her career. Her work questions her audience on ideas of “feminism, classicism, consumerism, and individual autonomy and desire” (http://www.barbarakruger.com/biography.shtml).
 ***
*** ***
*** ***
*** ***
*** ***
***
 ***
*** My favorite shot in the series.
***
 ***
*** ***
*** ***
*** ***
*** ***
*** ***
*** My favorite shot in the series.
***

Wednesday, April 09, 2008
Journal 5 - Documentary Day by Day
With the idea of taking a photo each day, and telling some sort of story, I decided to take pictures of what I put on my feet each day.
 Wednesday - Hanging out at home
***
 Wednesday - Hanging out at home
***
 Thursday - Out to dinner with Jeremy
***
 Friday - Bookclub
***

Saturday - Dancing with the girls
***
***

Sunday - Couch to 5k Run
***
***
 Monday - Work
***

Tuesday - Work Again

Thursday, March 27, 2008
Journal 6 - Cross-Processing: Color to Evoke Emotion
I started playing around in Photoshop and wondered if there was a way to make photos look like old school postcards. I found a tutorial online for cross-processing and here is the before, the after, and the post card.
I love the feeling of nostalgia that is created with the cross-processing of the images.
 Original
***
 After
After
*** Postcard
***
 ***
***
 ***
***
 ***
***

I love the feeling of nostalgia that is created with the cross-processing of the images.
 Original
***
 After
After***
 Postcard
***
 ***
*** ***
*** ***
***
Wednesday, March 26, 2008
Exercise 6 - Combining Images
These images were created by taking 3 different shots to create a single image.


***
 ***
***
 ***
***
Tuesday, March 25, 2008
New Tat
 I have always had a love for mermaids. My first mermaid tattoo was done on my foot, this one as you can see is on my shoulder.
This one is an Olivia de Berardinis of Bettie Page.
Patsy at Fast Lane Tattoo laid the ink in 4 hours, I highly recommend him to anyone looking to get an amazing tattoo.
Friday, March 21, 2008

Thursday, March 20, 2008
Corned Beef and Cabbage
In honor of St. Patrick's Day, I made corned beef and cabbage for dinner. Turns out, Jeremy doesn't like corned beef and cabbage, but was willing to try mine anyway. I love it, so there was just more for me. Good thing I bought the smallest piece I could find!
Corned Beef and Cabbage
1.5 lbs corned beef trimmed of as much fat as possible
1 TBS peppercorns
1 bay leaf
1 small or 1/2 large head of cabbage - quartered
3 carrots - cut into large pieces
1 onion - quartered
3 cloves garlic - popped with knife
Place corned beef in pot with peppercorns, garlic, and bay leaf. Fill with enough water to cover meat, place lid on and simmer for roughly 2 hours.
Add onions and carrots and continue to simmer for another 10 minutes.
Add cabbage and simmer for another 15 minutes or until cabbage is done to your liking.
Use slotted spoon to remove meat and veggies. Serve with mashed potatoes.
While this is not a meal I would want to eat all the time, once or twice a year it is as comforting a meal as they come.
Journal 4 - Lighting and Portraits
This journal assignment was challenging and fun. I took it from a slightly different perspective, using colored paper to gather different effects.
 The first column of shots are taken with no flash, with just colored paper held up to reflect the color. The color is not very strong, however when enlarged, hints of the color can be seen.
The second column was used in a similar manner, only with the flash turned on and being softened by a white piece of paper used as a filter.
The third column is done with the colored paper as the filter.
***
 This shot was taken with no filter on the light, the light placed on chest at head level.
***
 This shot was also taken with the light at head level, with a purple piece of paper over the light as a filter.
***
 This shot was taken with the light behind her at head level with me looking up from the floor.
***
 The light was at head level, with the pink paper as a filter over the light.
Thursday, March 13, 2008
In Class Shoot - Lighting
We played with lighting in class. There are some great ways to get different results depending on the type of lighting and the angle of lighting.
 Side Lighting - Edited with Magnetic Lasso and Edited Levels on Background
***
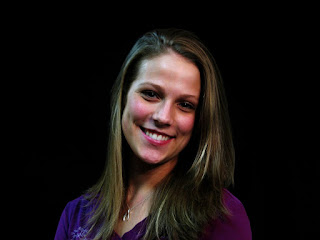 Side Lighting with Black Background - Curves Edited
***
 Backlit - Edited Levels
 Side Lighting - Edited with Magnetic Lasso and Edited Levels on Background
***
 Side Lighting with Black Background - Curves Edited
***
 Backlit - Edited Levels

Subscribe to:
Comments (Atom)